Introduction
First of all, thank you for buying this theme. To make your experience pleasant, we've added as much info as needed in this documentation.
While we have tried to keep an easy-to-use user interface, we understand that you might have some questions about installing and using our theme. Following is a detailed step-by-step guide to help you with most of the questions or issues that you may be experiencing.
How to Use This Document
To help you quickly locate what you are looking for, we have created an extensive menu for this document at your left side. Please use it to navigate to the desired section.
Can't find what you need? Contact us via this form. We will respond in the shortest time possible.
Installation
There are two methods to install the theme. If the normal installation method (a) is not supported by your web host, you will have to use the alternate option (b).
a. Normal Installation
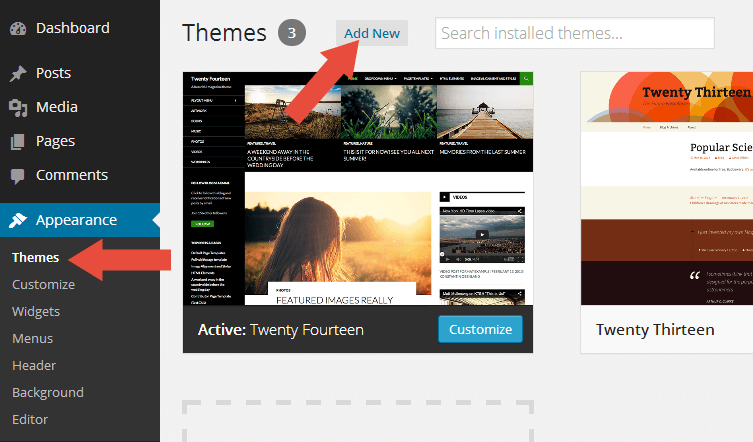
- Log into your WordPress admin panel and go to Appearance → Themes
- Click the Add New button at the top.
- Click the Upload Theme button at the top.
- Click the Choose File button and navigate to the location of the theme zip file featured.zip.
- Click Install Now to begin the installation.
- Wait for the success message, then click Activate.
b. FTP Installation (alternate method)
- Unzip the theme zip file featured.zip.
- Using an FTP client to
access your host web server. Go to
/wp-content/themes/and place the theme folder inside it. - Log in to your WordPress admin panel and go to Appearance → Themes
- Locate the theme thumbnail and click the Activate link.
ImportantAfter activation, you will be presented with several plugins that you have to activate. Do not forget to activate them all or not all of the theme features will be available.
Installing Recommended Plugins

Featured recommends a few plugins to extend it's functionality. These plugins can be installed automatically from the notification in WordPress Administration Panel (Dashboard). Although, Featured will work perfectly without any of these plugins, you may want to extend the theme's features with them.
Recommended Plugins
- One-Click Demo Import
To import content from our demo!
- Page Builder by SiteOrigin
Strongly Recommended
This plugin allows you to build a custom page with drag and drop feature.
How to Install the Plugins
- Log into your Dashboard page.
- Go to Appearance → Install Plugins.
- Click install link below the plugin you want to install.
One-Click Demo Import
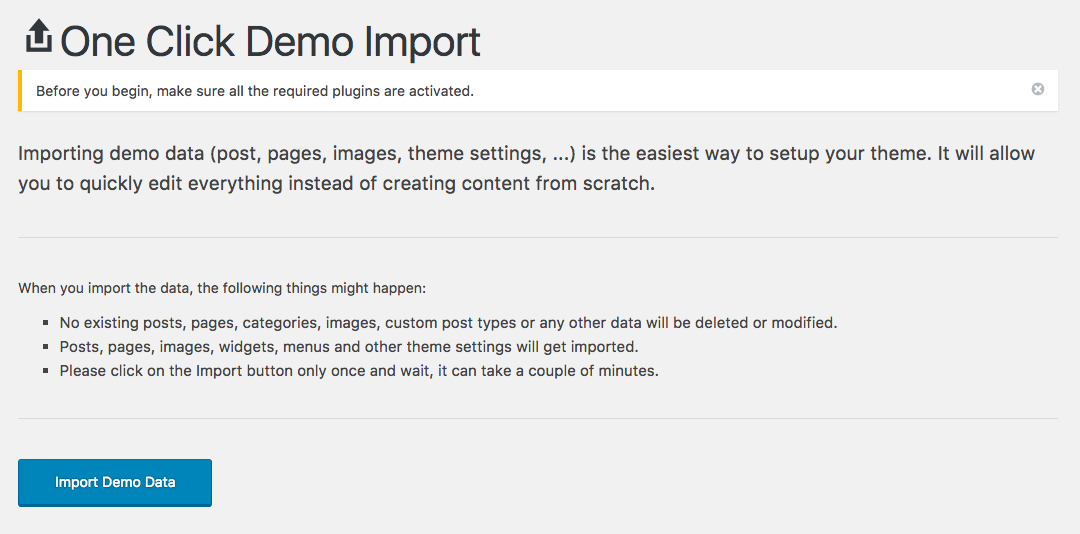
We have included Featured with one-click demo importer feature. You can easily to import content from our demo then you can edit it with your content. But first please install all recommended plugins. Please take a look the Installing Recommended Pluginssection to read how to install the plugin.
After that please go to Appearance → Import Demo Data, then click the Import Demo Data button. Depending upon the number of content, images and server speed, the process may take long to complete.
ImportantIn some themes you need to install some of the recommended plugins before importing the demo content such as Jetpack, TJ Team Content, Advanced Custom Fields Pro, WooCommerce, etc.
Child Theme
WordPress child theme allows you change the functionality of the theme without having to edit the original/parent theme template files. If you plan to making any customization, we recommend to create a child theme instead of editing the theme template files. Since the child theme is stored separately, you don't need to redo the changes next time you upgrade the theme.
Creating a Child Theme
There's a plugin you can use that will create a child theme from within the WordPress dashboard: http://wordpress.org/plugins/child-theme-configurator/ or you can download Featured blank child theme.
More About Child Theme
You can read more about Child theme on WordPress Codex →
Regenerate Thumbnail
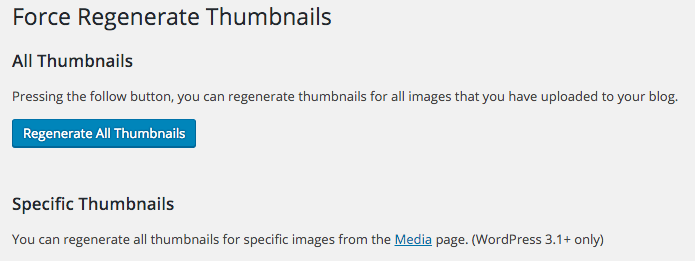
If you are migrating from another theme, then upon activating Featured you may find previously added images display strangely with weird aspect ratios and sizes. Don't worry. It is normal. The image thumbnails are required to be recreated using Featured's presets.
There is a very easy fix to this issue. Just install Force Regenerate Thumbnails plugin.
How To Use It?
- After you install it, go to Tools → Force Regenerate Thumbnails
- Click the Regenerate All Thumbnails button
- Depending upon the number of images and server speed, the process may take long to complete.
- After it done, you can deactivate and delete the plugin.
Site Icon / Favicon
The Site Icon is used as a browser and app icon for your site. Icons must be square, and at least 512px wide and tall.

How to Upload your Icon?
- Select Appearance → Customizer
- Choose Site Identity
- You will see the Site Icon uploader.
- Upload your icon at least 512px x 512px
Logo
By default, Featured styles the site title with pre-defined styles and displays it as Text Logo. If you'd like to upload your custom logo for your site, please follow the steps below:
- Select Appearance → Customizer
- Choose Site Identity
- You will see the Logo uploader.
- Upload your icon at least 90 x 30 pixels
Typography
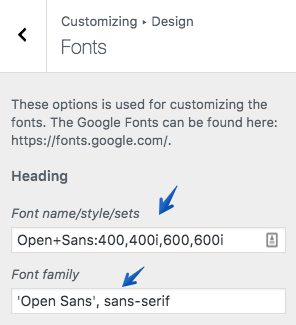
By default, Featured uses Playfair Display, Georgia and Montserrat font as default theme font family. But Featured provides an option to change it in case you dont like it. It is easy to change it, please follow the steps below.

Access the setting
- Select Appearance → Customizer
- Choose Design → Fonts
- You will see the settings for each font
How to use it
Each setting have 2 setting Font name/style/sets and Font family , if you want to change the fonts you need to change both.
Please follow the example steps so you will understand how to use it. First please go to https://fonts.google.com/ then choose font you like by clicking the + button.
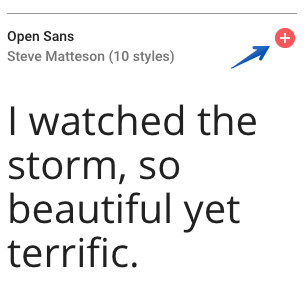
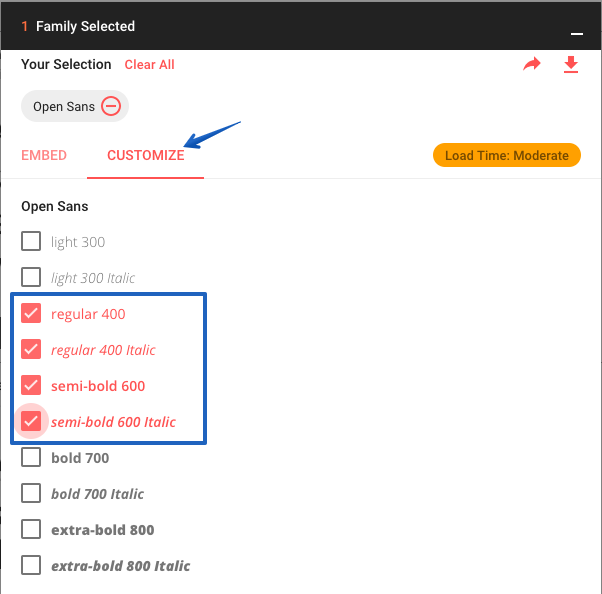
Then you will see a small popup window at the bottom, click it. You can customize the font style, for example you need a Regular and Bold style. Click the Customize tab then choose the style, please follow the image below.
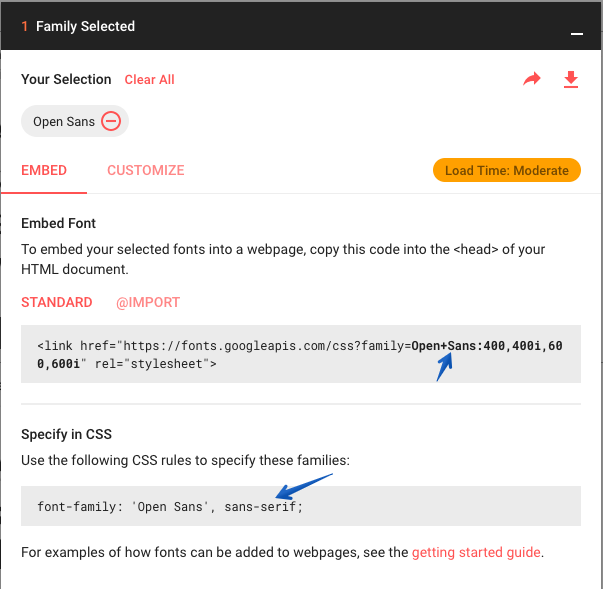
After that back to the Embed tab. Copy the data, paste it to the Font name/style/sets and Font family setting in the Customizer. If you confuse, please take a look the 2 picture below
Colors
Featured provides option to change the accent color, the default accent
color is #e60000 or red.
How to Change it?
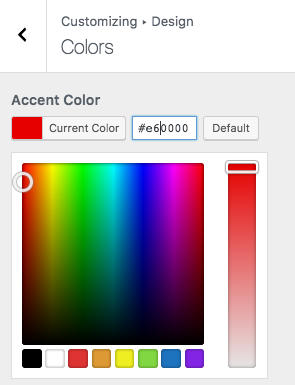
- Select Appearance → Customizer
- Choose Design → Colors
- You will see the option to change the color.
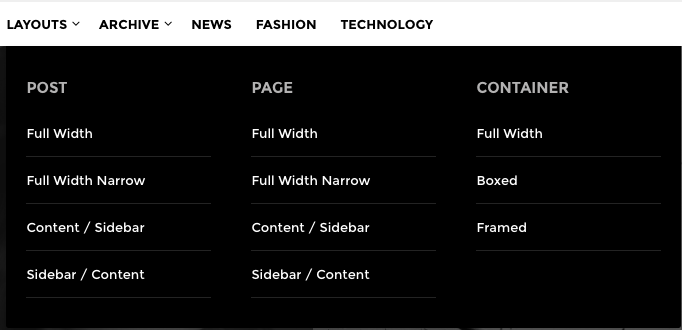
Layouts
Per Page/Post Basis Layout
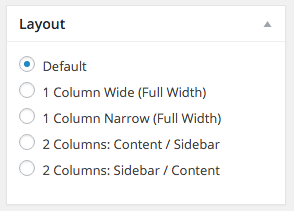
You can setup the layout per post or page. This is done when you add or edit the post or page. There are 4 types layout you can choose
How to use it
- Assuming you're at the new post or page screen (Posts → Add New) or (Pages → Add New)
- After you create the post or page, scroll down and find Layout meta box.
- Choose the layout.
Layout Type
- Full Width: Display the content in a full width mode or without sidebar.
- Full Width Narrow: Display the content in a full width mode or without sidebar.
- Right Sidebar: Display the content with sidebar on the right.
- Left Sidebar: Display the content with sidebar on the left.
Archive Layouts
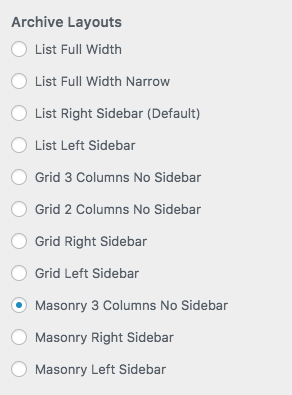
This archive layouts setting will applied to all archives page such as category, tag, author, and etc.
How to use it
- Select Appearance → Customizer
- Choose Design → Layouts
- You will see the option to change the layouts.
Layout Type
Please click the link below to see the layout on demo site.
Menu (and Mega Menu)
Featured supports the custom menu function to allow you to setup your menus. You can set it through following steps.
Creating Standard Menu
- Go to Appearance → Menus.
- To create a new custom menu, click the create a new menu link, give the menu a name, and click Save Menu button.
- You can add pages, categories or custom link's to the menu using the boxes at the left, add items to the menu and drag/drop to arrange them.
- And, be sure to select Primary Location or Social Links as the Theme Location before saving your menu.
- When you are done, click Save Menu
Creating Mega Menu
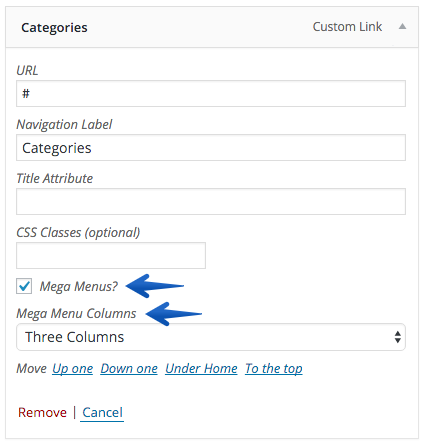
- Go to Appearance » Menus and select your menu.
- Expand the item you wish to add mega menu to by clicking the arrow icon.
- Check the Mega Menus option.
- Choose the Mega Menu Columns option.
- Save Menu. Next configure sub-items (below).
ImportantYou can use the mega menu only with the parent/top-level item.
Configure Mega Menu Items
To make mega-menus work, you have one additional step of adding sub-items.
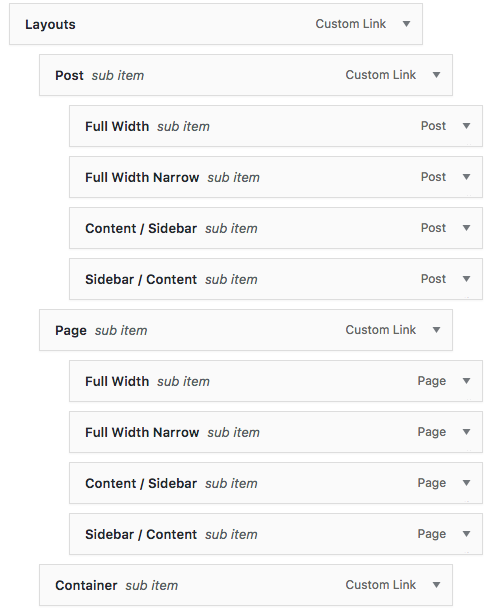
On the front-end you will see the result just like the image below
Sidebars and Widgets
Custom Widgets
Featured comes with 11 custom widgets to give you more flexibility to customize your site.
- Advertisement: Show your custom ads, adsense, amazon, etc easily.
- Facebook Like Box: Allow you to display your Facebook Page in a Like Box, hence your reader can 'Like It' directly at your site.
- Most View Posts Thumbnail: Display most view posts with thumbnail, post date and post view
- Popular Posts Thumbnail: Display popular posts by comments along with thumbnail and post date.
- Random Posts Thumbnail: Display random posts along with thumbnail and post date.
- Recent Posts Thumbnail: An improvement over the default recent posts widget, including thumbnail.
- Feedburner: Allows your reader to subscribe your posts through feedburner service.
- Twitter Timeline: Display an official Twitter Embedded Timeline widget.
- Video: Easily to display your video from some popular video website such as youtube, video, etc.
- Social: Display your social media link profile.
- Tabs: Display popular posts, recent posts, recent comments and tags in tabs.
Sidebars
Featured provides 7 sidebar areas:
- Primary Sidebar: Main sidebar that appears on the right of your site.
- Footer(1, 2, 3, 4, 5, 6) Sidebar: Footer sidebars that appears on the bottom of your site.
Custom Sidebars
Featured is fully compatible with all of the custom sidebars plugins available for free. Custom sidebars allow you to change the sidebar to display different widgets per post or page.
If you wish to use custom sidebars feature, we recommend the Simple Page Sidebars plugin. It's an extremely powerful and flexible free plugin.
Using the Simple Page Sidebars
- To use this plugin, first, go to Settings → Reading
- Under the Default Sidebar select the default sidebar, in this theme you should select Primary Sidebar
- Go to post or page you wish to change with the new sidebar.
- Scroll down and find Sidebar meta box(see image below).
- Click the Enter New link to create new sidebar.
- Click the Update button.
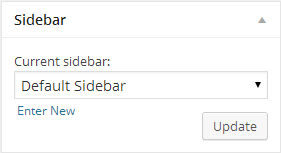
Then, last step is you only need to go to Appearance → Widgets and choose the widget you wish to use then put it in the new sidebar.
Container Layouts
Container layouts is a variation of the theme container. Featured provides 3 option to choose:
- Full Width
- Boxed
- Framed
How to Choose it?
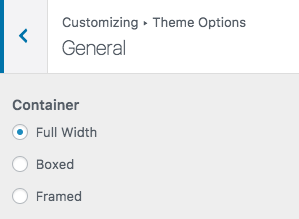
- Select Appearance → Customizer
- Choose Theme Options → General
- You will see the option to choose the container layouts.
Featured Posts

Featured Posts is a set of posts based on post tag you choose on Customizer. You can display important posts or something like editor's choice posts. It displayed on home page and archive page.
How to Use it?
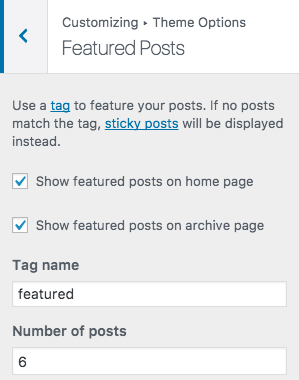
- Select Appearance → Customizer
- Choose Theme Options → Featured Posts
- You will see the featured posts settings.
Page Builder
We integrated Featured with Page Builder by SiteOrigin plugin to build the home page. It makes easier to build complex home page. Before you create your custom home page with this plugin, please familiarize yourself with it by reading their official documentation.
Built-in Blocks
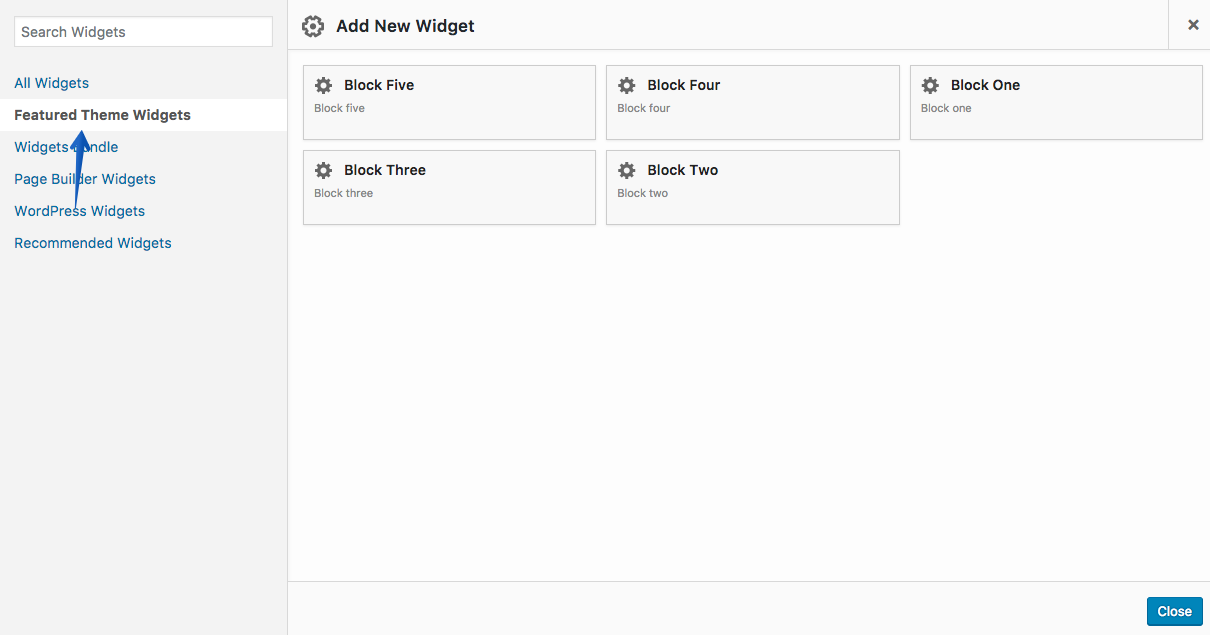
Featured comes with 5 custom blocks for the page builder, we include it to help you to build your custom home page. If you already read the Page Builder documentation, to add block or content to the page builder you need to click the + Add Widget button.
When the pop up modal appear, please click the Featured Theme Widgets to see Featured's built-in blocks.
Infoif you need more custom widgets for the page builder, you can install SiteOrigin Widgets Bundle.
Home Page
Please first read the SiteOrigin Page builder documentation, because the home page is based on this plugin. After you understand it, please follow the steps below to show the home page.
Creating the Home Page
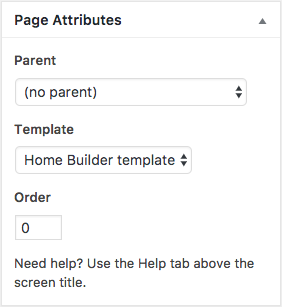
- Assuming you're at new page screen (Pages → Add New)
- Add the title with Home Page or anything.
- Under Page Attributes switch the Template to Home Template.
- Continue by adding the prebuilt layout below.
Display the Page
Once you have created a page that you would like to use as your home page, please follow the next steps below:
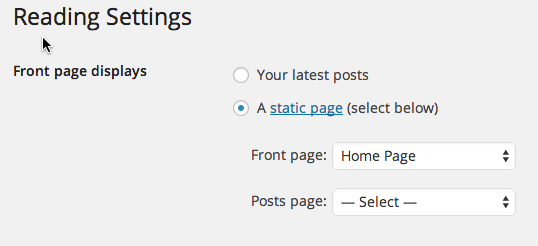
- Go to Settings → Reading
- Choose A static page option for Front page displays
- Next to Front Page, select the page you wish to used as the home page.
- Save Changes.
Shortcodes
You can use these shortcodes by installing our Shortcodes plugin which available for free! You can see the shortcodes in action here.
- Please download on http://wordpress.org/plugins/freshthemes-shortcodes/
- Or you can go to Appearance → Install Plugins. Click install under TJ Shortcodes.
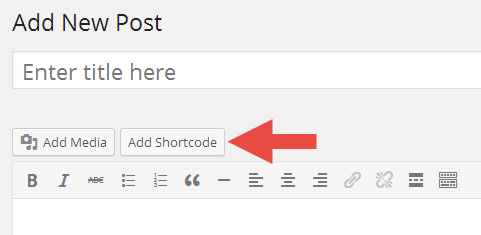
- Then go to the post or page editing screen.
- You should see Add Shortcode button(see image below) beside the Add Media button.
- Click on it, then you will see a selectbox to choose the shortcodes you wish to use.
- Finally, click the Insert Shortcode button.
Translation & Internalization
All of our themes include a language file to make translating to a different
language easy. Inside the theme folder /wp-content/themes/themename/languages ,
you'll find a language file named themename.pot . Or in this
theme file named featured.pot
Configure WordPress
Before translating the theme, you'll need to make sure WordPress is setup
correctly with your locale. Open wp-config.php and modify
the line below.
/**
 * WordPress Localized Language, defaults to English.
 *
 * Change this to localize WordPress. A corresponding MO file for the chosen
 * language must be installed to wp-content/languages. For example, install
 * de_DE.mo to wp-content/languages and set WPLANG to "de_DE" to enable German
 * language support.
 */
define( 'WPLANG', '' );
Translating the Theme
- Download and install Poedit.
- Open
featured.potin Poedit. Translate as needed. - Save the file with the locale. For example, if you translate the theme
to German language then you would save your files as
de_DE.po. - Copy both these files(de_DE.po and de_DE.mo) under the languages folder of featured.
Copyright and Credits
Resources Used
- HTML5 Shiv - MIT/GPL2
- FitVids - WTFPL
- SlickNav - MIT
- Font Awesome - MIT
- Normalize.css - License
- Owl Carousel - MIT